Weboldalamat a háttérben folyamatosan újítom, javítgatom! A már meglévő tartalom, és funkciók változatlan formában elérhetők és használhatók. My website is under maintenance. You can still use the existing functions and content.
How to photograph lightning?
Nighttime
Tom A Warner, American scientist can provide more information about how fast does a lightning strike happen (www.ztresearch.com) - as a strike travels the 1 km distance from the bottom of the cloud to the ground - is about 0.02-0.04 seconds (slow motion recordings of lightning strikes here: vimeo.com/133398724), so using a smart phone and relying in your own reaction time during lightning photography is almost impossible. If you have a short reaction time, you can only catch the return strikes on camera! And in addition, to avoid motion blur, you need a tripod. You also recommended to use only certain type of cameras: Those ones which support manual exposure time settings and support at least 10 seconds of exposure time. These cameras should feature the manual apperture size and manual focus settings. If your camera supports only autofocus, no manual focus setting, the lightning will be blurred according to Murphy's law!
In old analog cameras which use films instead of CCD or CMOS sensors, the greater the apperture, the more quality the lightning photo will have. But in digital cameras, too bright lightning will burn out the picture, correcting the photograph is only possible if the camera saves RAW images. So use small apperture sizes. But to correct myself, you should use middle apperture sizes (4.8 or 5.6), if the lightning is far away. But if there are less than 10 seconds between lightning and thunder, you should swith to the highest apperture (use minimum the value 8.0). In other words, the brighter lightning causes louder thunder. Optional apperture sizes represent thunder loudness.
The hardest thing in photographing lightning is rotating or moving the camera and zooming in! You need to point the camera toward the storm and it is very hard without ambient street lamp and traffic lights. If you are not sure, use wider angle, and take a test picture, then zoom in and correct the angle carefully toward the perfect composition. Mind your legs very carefully. Don't hit the tripod, the smallest kick can ruin the composition, you need to set it up again! The most important things you need to consider photographing lightning:
- What is in the composition? The ground should fill the 10% and the sky should fill the remaining 90% of the picture. If you are photograping from a higher mountain to a valley, these numbers can be a little different.
- Consider the exposure time and apperture? Too long: City lights can burn the picture out, so you should compose the city out if it is possible!
Setting up exposure time and apperture: There's no standards for the camera handling buttons, each cameras are different (just like smart phones). You have to learn handling your own camera, even in total darkness. You can test your skills in the darkness at nighttime, imitating lightning using your flashlight. Learn where are the buttons of your camera without seeing them. Learn setting your camera ready as fast and as precisely as possible. Take photographs with different appertures and exposure times at calm, peaceful nights without storms in order to learn how long can your exposure times go without burning out! Notice or remember those numbers and settings! Do not allow lens flare effects caused by street lights! If you skip these steps, you will lose very worth 10-second-periods and miss chances for shooting professional photos! In a storm, you should only use the exposure button without wasting time on settings!
I don't know how do DSLR cameras work, but common disadvantage of cheap cameras is that there is no 'BULB' exposure time, you cannot wait for the lightning and stop photograping when do you want. You have only fixed exposure times, so when I feel it is about time for a lightning flash, I usually set 30 seconds for exposure time. You can use your 'sixth sense' during photograping lightning.
Daytime
It is much harder to take lightning photographs at daytime than at nighttime and is almost impossible at midday in a weaker storm. Depending on the period of the day and in the overall darkness, you can try continuous mode of the camera. You can take videos but the quality of video frames are far worse than photographs! Before having my new CANON camera and using it's CHDK feature, I could only take an average number of only one single lightning photograph.
Lightning triggers
If you take the photography seriously (not only lightning photography) and have expensive DSLR camera, you can order lightning triggers here, considering compatibilty with your camera type: store.lightningtrigger.com
I linked this for a starting guide because I personally don't know how do lightning triggers work. As I mentioned, lightning strikes in 0.03 seconds, so choose a lightning trigger machine accoring to this fact!
Photographing lightning with CANON cameras, using CHDK feature and the MDFB2013.LUA script
Read this section ONLY if you have a CANON camera and if it supports CHDK. If you have this kind of camera, you might in a more fortunate situation, because of the CANON Hack Developement Kit software, in which you can run programs, scripts for variable photographing options. I wrote the 'might' word in highlighted style, because the common reaction time of this script (which is 0.1 s, my CANON SX500 IS camera can go even faster, about 0.06-0.08 seconds) is still much longer, than a lightning strike (0.03 s).
- Mode: Photo or video (I don't use video mode)
- reaction mode: normal, test, fast (normal mode allows your camera to autofocus before taking the picture and it makes almost impossible for you to catch lightning. I will write about the test and the fast mode later.)
- trigger threshold: I will write about it later.
- trigger delay (0.1 sec): This means how much time your camera need to wait after taking a triggered shot.
- burst/review/video time (s): This is supposed to use with video mode, I do not use it)
- compare interval (ms): The time in which the camera compares the previous picture with the current one. You should change it to as short as possible. I use 1 or 2, but you should play with it. I didn't study its effect on overall 'lightning triggering efficiency'.
- timeout (seconds): If there's no trigger, the camera will switch of in this time.
- pixel step (pixels): I will tell about this later.
- detection channel: I usually set this onto "Y" mode, which means the camera to react to the change of the overall brightness. Other option is hue and others.
- columns: Later.
- rows: Later.
- masking: I didn't use it, it is on 'no'.
- display power saving: What does the camera supposed to do between two photographing shots. I use the 'bcklite' to spare energy.
- splash screen: Displays script name at starting, this has absolutely no importance for us.
- logging?: Error searching, debugging.
Beginning with rows and columns or rather the cells made by them: As the camera runs the script, it compares the brightness of the pictures in the "compare interval" and averages the differences in the cells. If one of these difference numbers (I name them as 'T' values) reach or get larger than the trigger threshold, the camera takes a picture. Increasing the pixel step value makes the camera count with only the 'n'-th pixel (pixel step) value.
This description is a little complicated, but how do you use the script and what do you need to consider?
I thought first larger pixel step makes shorter reaction time. But you cannot shorten the 0.1 second reaction time (tested with flashlight), so consider increasing the sensitivity of your camera to make it taking a photo after the smallest flash, the smallest sign of lightning strike. Use more many rows and columns. You can fasten your camera using larger pixel step but picture noise can is sensed as movement by the camera and can trigger photos. This means, the camera will accidentely can take photos continuously. Picture noise is weak at daytime or at total darkness but is strong at twilight.
I wanted to show those T values on this picture as you can see here.
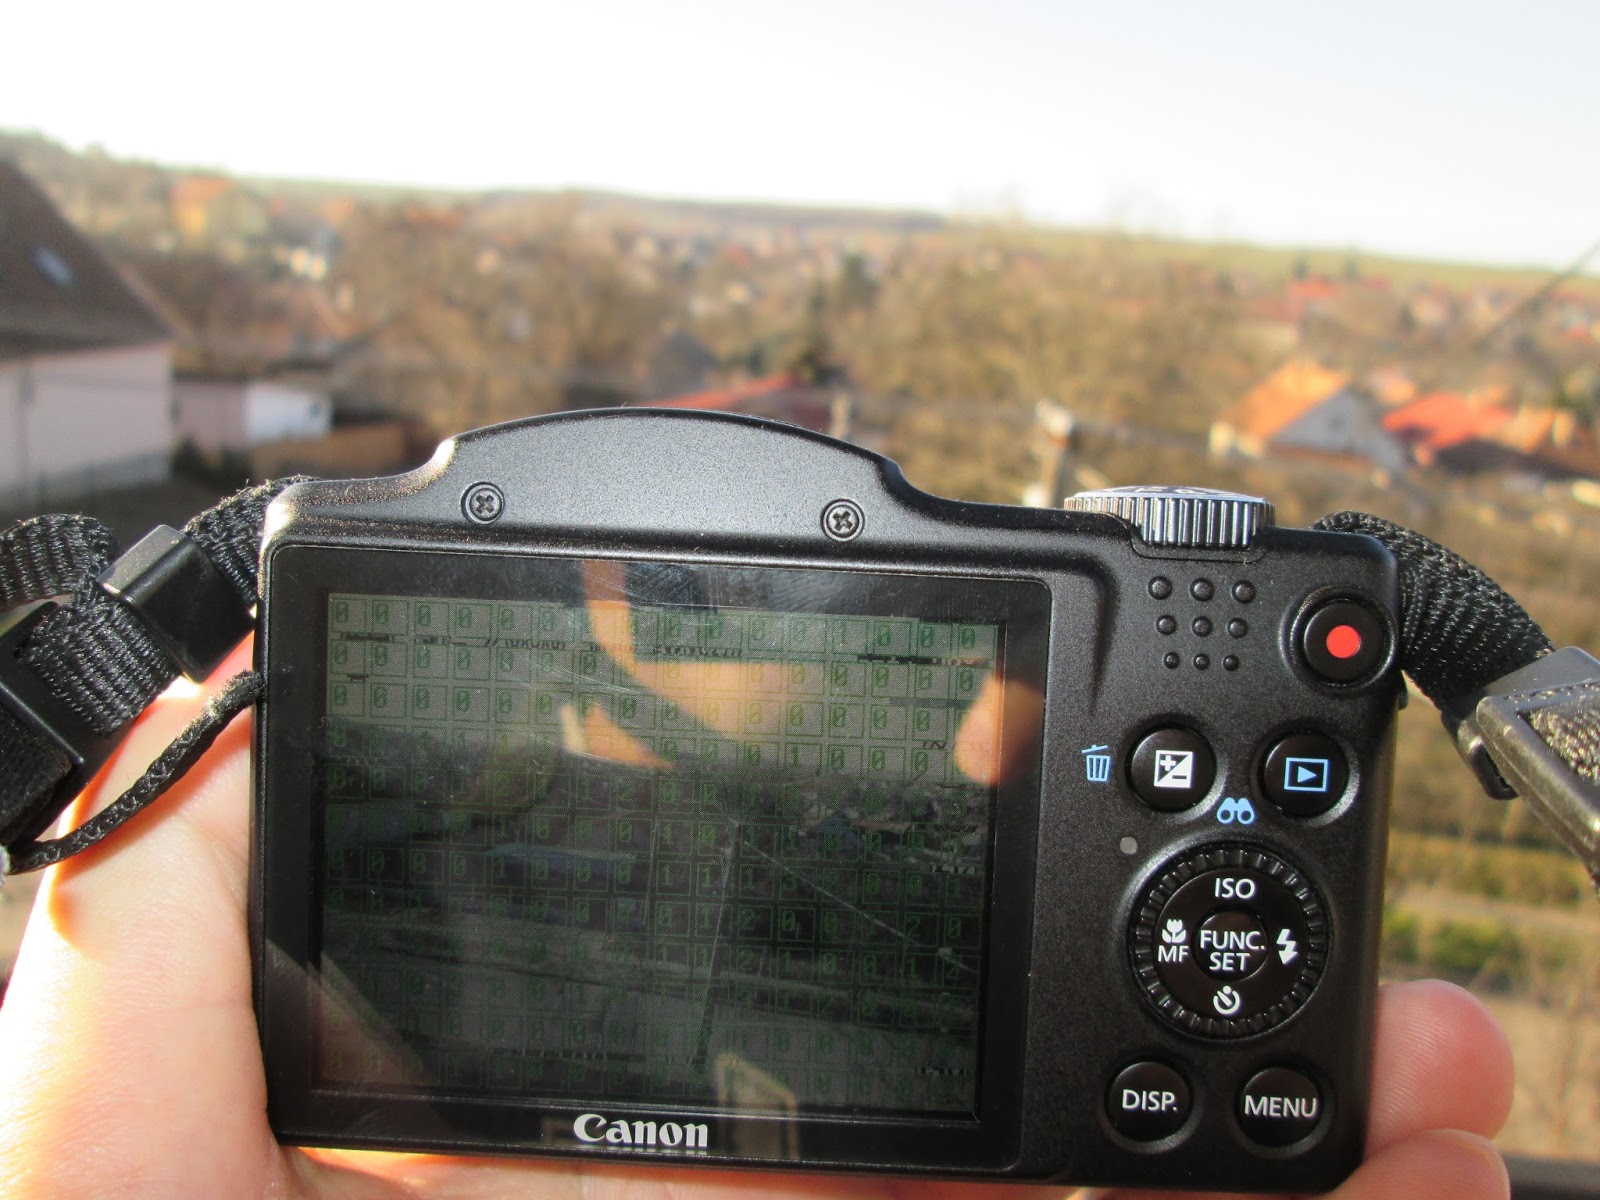
At twilight, picture noise is the strongest, but this period of the day is the most recommended to use CHDK and MDFB2013.lua!
Put your camera on a tripod and run the script in 'test' mode (set 'reaction mode' to 'test'), before doing anything else. Set pixel step to 20!
You need to have 6 rows and 8 columns! If there is no lightning and no movement, notice the greatest 'T' values. I assume they will be about 2 or 3. Set trigger threshold to 4! "T" values without movement +1! Notice: Use the as smallest ISO value as possible. Do not afraid using CHDK overrides, you may use ISO 80. You do not need to change other settings. Set 'reaction mode' to 'fast' and begin photograping. It is possible that wind (moving leaves of trees) or rain trigger the camera, so you might change compare interval. If it does not work, you should photograph in calm weather or compose out trees! If there is no other options, run 'test' mode again and set up a larger trigger threshold. Feel free to play around with changing values of trigger threshold and compare interval.
Nighttime storms and CANON CHDK
At night, you should use CHDK only when lightning flashes are rare in time (1 flash in every 2 minutes or even rarer). Brightness of lightning flashes are weak in midday between 9am and 5pm but it depends on types and severity of thunderstorms. At midday, you usually should use video mode but you of course can try using CHDK, especially in spectacular storms.
At night, use 12 columns and 8 rows, or maybe try using 16 columns and 12 rows. Pixel step should be 15 instead of 20. There is no importance of trees and wind, because they will be visible only during a lightning strike (Except if you taking photos in a very light polluted area.) Other things are the same as photographing daytime lightning.
Taking photos of lightning using CANON CHDK without a tripod.
There are sites that writes you can use CANON CHDK without tripod. But in my opinion, the bare hands of a human is shaking especially if someone is filled with adrenaline! So 'T' values go even higher, because the camera will sense a lot of movements. If you have a window, especially a rooftop window you can elbow on and photographing the storm, you still need 6 columns and 4 rows (as I know this is the default option). You should use 8 as pixel step or either leav the 6 as default setting. You also can leave the default trigger threshold (10) and take photos during you or your friend set up the tripod for the camera.
Rain and wind
These unwanted phenonema are inherents of the thunderstorms but can be the greatest enemies of photographing.
Rain: I read many solution for rain protecting the camera (nylons, rags) but I made a 'cap' for my camera using a top of an ice cream box and a thin rope. There is no 'best' or 'safest option' against rain, it can splash your camera but I think this may can shield the lens from the water and protect the camera. You still need a lens friendly wiper rag in your pocket to clean your lens repeatedly. If rain falls vertically, it is the most fortunate case, but in heavy rain, you cannot avoid those little 1 mm rain droplets going to your lens, you will still need that wiper rag.
Wind is even a greater enemy of photographing. There is no solution besides that you are holding your tripod strongly or searching another calmer place. But in that case you will have another angle of the storm, and that is maybe not the greatest angle for catching lightning on camera. The wind snapped up my tripod many times, I even remember a case when it made my tripod collapse. In that time, the ice cream box top drove down the force and prevented the camera from damage. Good news that in supercells, severe storms, the chances of catching lightning facing to the sides of the storm is larger than facing toward it and you can even make greater pictures.
Batteries
According to 'Murphy's law', batteries exthaust exactly when you could shoot the most spectacular photographs, so you should charge it to 100% in the morning of a stormy day. For other photo themes, for instance family, friends, pets, use your smart phone or a cheaper non-professional camera. They can wait for your autofocus or a second photograph but lightning cannot. If you are documenting weather, you can photograph clouds with those cheaper cameras. If you want a time-lapse of clouds before the storm, begin charging your battery immediately. Consider having extra batteries if your camera only supports NiMH batteries because you cannot charge them if they are already or still have some charge. That can lead to losing capacity of those NiMH batteries.
Memory cards (SD, MicroSD, or XD cards)
'Murphy's law' again: If you have a small capacity (4 GB or smaller) SD card, you notice you have ran out of capacity, only 1 or 2 pictures and the card is full. Especially if you record videos. Always move those pictures and movies to the computer! Computers today (2016) have 500 GB or greater winchester, but a 100 GB sized winchester is still great enough for handling photos and videos you recorded! Always free the card in the morning of a stormy day. You should not spare money from a 8 GB or larger sized memory card if you had money a nice digital camera, it is available for the 10% of the price of the camera! You should have memory cards for each cameras or electonic devices you use but do not swap them! If you have a CANON camera and use CHDK, swapping the cards will lead to the CHDK not to start!
Lightning photo montages
If you want many lightning in one picture, do not take only one picture for example with a 5 minutes long exposure time! One photograph should contain one picture! After the storm if there are pictures can fit into each other use your computer to edit them together with a picture editor like photoshop!
